How to Set Up OpenClaw With Your Pieces Long-Term Memory
A step-by-step guide to setting up OpenClaw with Pieces Long-Term Memory - so your AI agent has full context of your work from day one.
 Jack RossMarch 27, 2026
If you're using AI agents, one of the biggest limitations is memory. In this guide, I'll show you how to connect OpenClaw to Pieces Long-Term Memory so your agent instantly knows everything about you and your work, and can operate 24/7 while building context from everything it does.
What You'll Need:
- A computer with Node.js installed
- Pieces Desktop App
- ngrok
- An OpenClaw-compatible API key
Setup Time: 3-5 minutes
Step 1: Download Pieces and Enable Long-Term Memory
Download Pieces from pieces.app and install the desktop app.
Once installed, open Pieces and go to Settings → Long-Term Memory and make sure it's enabled.

This allows Pieces to capture your real work — your screen, clipboard, and activity — and turn it into structured memory over time.
The more you use your computer, the richer your memory gets.
Step 2: Start the Tunnel
To make your local Pieces instance accessible to OpenClaw, you'll need to expose it using ngrok. In your terminal, run:
ngrok http 39300
You'll get a URL that looks like this:
https://abc123.ngrok-free.dev
Example of terminal output:
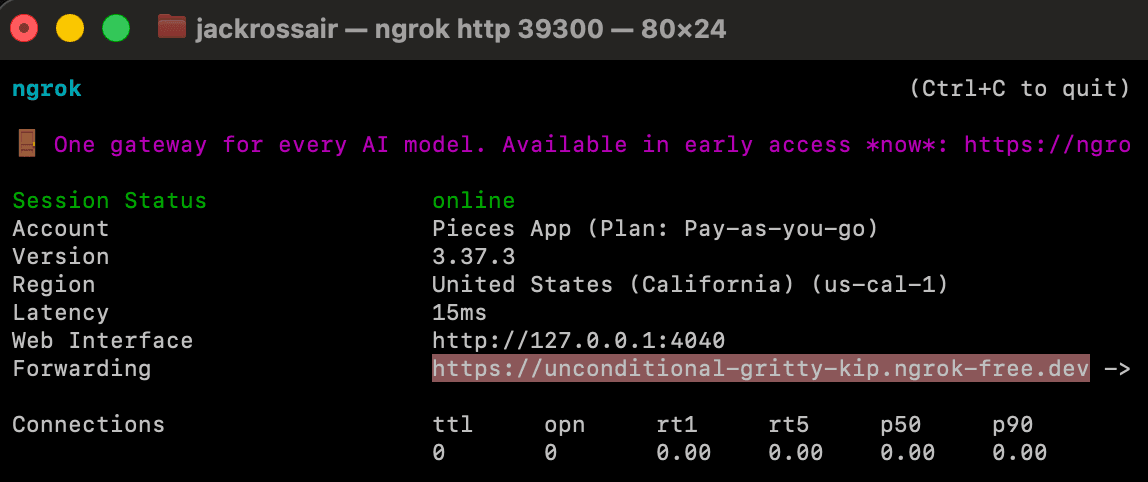
Copy that URL — you'll need it in a later step. Keep this terminal window running.
Step 3: Install OpenClaw
Head to https://openclaw.ai and copy the install command from the site.
Paste it into your terminal and run it.
Step 4: Select Your Model and Launch OpenClaw
When prompted, choose your model and add your API key.
Then launch OpenClaw in the browser:
openclaw dashboard
You should now see the OpenClaw interface open in your browser.
Step 5: Install the Pieces Long-Term Memory Skill
In OpenClaw, navigate to the Skills page and click Browse.
Search for Pieces and install Pieces Long-Term Memory MCP.
Or download it directly at: https://clawhub.ai/jackrosspieces/pieces-mcp
This skill teaches your agent how to connect to Pieces, query your long-term memory, and create new memories.
Step 6: Let the Agent Configure Itself
Go to the chat and type:
"Set up my Pieces long-term memory"
OpenClaw will read the skill and begin configuring everything automatically.
When prompted, paste the ngrok URL you copied in Step 2.
From there, the agent handles the rest — building the MCP endpoint, configuring MCPorter, installing dependencies, and restarting the gateway.
Step 7: Test It
After your gateway restarts, ask your agent:
"Ask Pieces who am I and what am I working on?"
It will query Pieces Long-Term Memory and return an answer based on your real activity — not guesses, not generic responses. Your actual work.
Step 8: Create a Memory
Ask your agent:
"Create a memory that OpenClaw is now connected to Pieces Long-Term Memory"
That memory gets written directly into Pieces. Open the Pieces app and you'll see it immediately. It's now part of your long-term context, available in every future session.
What This Unlocks
Once connected, your OpenClaw agent can:
- Recall what you've worked on across sessions
- Understand your projects and past decisions
- Reference your history without you re-explaining anything
- Build new memories automatically over time
Your agent isn't starting from scratch anymore — it already knows you.
You can use this same skill.md file to teach any AI agent how to connect and use Pieces as it's long-term memory!